addSensors
Description
addSensors(
adds all the scenario,sensors,hostVehicleID)sensors to the vehicle with unique ID
hostVehicleID, in the driving scenario
scenario.
Examples
Add Sensors to Driving Scenario and Get Target Poses Using Sensor Input
In this example, you will add sensors to a driving scenario using the addSensors function and get ground-truth target poses based on the individual sensor inputs. Then, you process the ground-truth target poses into detections and visualize them.
Set Up Driving Scenario and Bird's-Eye-Plot
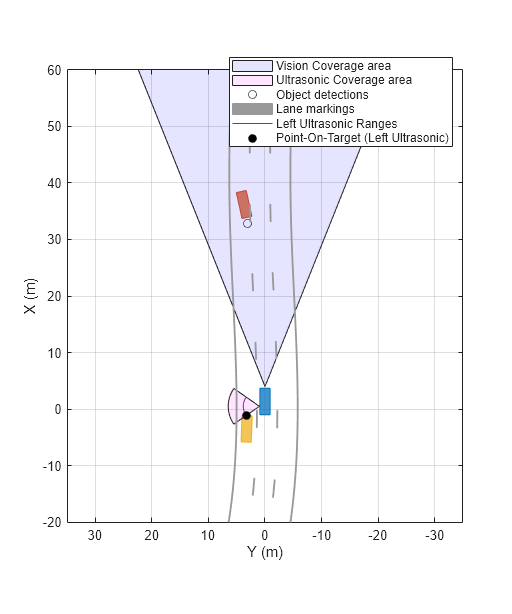
Create a driving scenario with an ego vehicle and two target vehicles. One target vehicle is in the front and the other is to the left of the ego-vehicle.
[scenario, egovehicle] = helperCreateDrivingScenario;
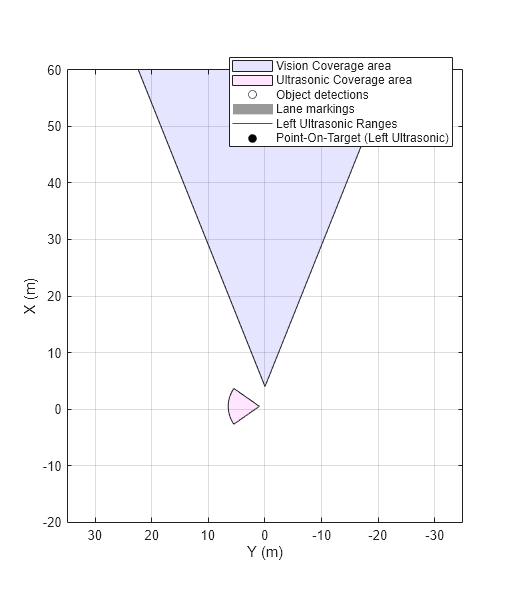
Configure a vision sensor to be mounted at the front of the ego vehicle.
visionSensor = visionDetectionGenerator(SensorIndex=1,SensorLocation=[4.0 0],Height=1.1,Pitch=1.0,DetectorOutput="Objects only");Configure an ultrasonic sensor to be mounted at the left side of the ego-vehicle.
leftUltrasonic = ultrasonicDetectionGenerator(SensorIndex=2,MountingLocation=[0.5 1 0.2],MountingAngles=[90 0 0],FieldOfView=[70 35],UpdateRate=100);
Create a bird's-eye-plot to visualize the driving scenario.
[detPlotter,lmPlotter,olPlotter,lulrdPlotter,luldetPlotter,bepAxes] = helperCreateBEP(visionSensor,leftUltrasonic);

Add Sensors and Simulate Driving Scenario
Add both vision and ultrasonic sensors to the driving scenario using the addSensors function. You can add sensors to any vehicle in the driving scenario using the addSensors function by specifying the actor ID of the desired vehicle. In this example, specify the ego-vehicle actor ID.
addSensors(scenario,{visionSensor,leftUltrasonic},egovehicle.ActorID);Simulate the driving scenario. Note that you get separate target poses based on individual sensors by specifying their respective sensor IDs as inputs to the targetPoses function. This syntax returns the ground-truth poses of targets only within the range of the specified sensor. You then pass the ground-truth poses to their respective sensor models to generate detections and visualize them.
legend(bepAxes,'show')
lookaheadDistance = 0:0.5:60;
while advance(scenario)

    lb = laneBoundaries(egovehicle,'XDistance',lookaheadDistance,'LocationType','inner');
    [lmv,lmf] = laneMarkingVertices(egovehicle);

    % Get ground-truth poses of targets in the range of vision and ultrasonic sensors separately
    tgtposeVision = targetPoses(scenario,visionSensor.SensorIndex);
    tgtposeUltrasonic = targetPoses(scenario,leftUltrasonic.SensorIndex);

    % Obtain detections based on targets only in range
    [obdets,obValid] = visionSensor(tgtposeVision,scenario.SimulationTime);
    [lobdets,lobValid] = leftUltrasonic(tgtposeUltrasonic,scenario.SimulationTime);

    helperPlotBEPVision(egovehicle,lmv,lmf,obdets,obValid,detPlotter,lmPlotter,olPlotter)
    helperPlotBEPUltrasonic(lobdets,lobValid,leftUltrasonic,lulrdPlotter,luldetPlotter)
end

Helper Functions
helperCreateDrivingScenario creates a driving scenario by specifying the road and vehicle properties.
function [scenario, egovehicle] = helperCreateDrivingScenario
    scenario = drivingScenario;
    roadCenters = [-120 30 0;-60 0 0;0 0 0; 60 0 0; 120 30 0; 180 60 0];
    lspc = lanespec(3);
    road(scenario,roadCenters,Lanes=lspc);

    % Create an ego vehicle that travels in the center lane at a velocity of 30 m/s.
    egovehicle = vehicle(scenario,ClassID=1);
    egopath = [1.5 0 0; 60 0 0; 111 25 0];
    egospeed = 30;
    smoothTrajectory(egovehicle,egopath,egospeed);

    % Add a target vehicle that travels ahead of the ego vehicle at 30.5 m/s in the right lane, and changes lanes close to the ego vehicle.
    ftargetcar = vehicle(scenario,ClassID=1);
    ftargetpath = [8 2; 60 -3.2; 120 33];
    ftargetspeed = 40;
    smoothTrajectory(ftargetcar,ftargetpath,ftargetspeed);

    % Add a second target vehicle that travels in the left lane at 32m/s.
    ltargetcar = vehicle(scenario,ClassID=1);
    ltargetpath = [-5.0 3.5 0; 60 3.5 0; 111 28.5 0];
    ltargetspeed = 30;
    smoothTrajectory(ltargetcar,ltargetpath,ltargetspeed);
end
helperCreateBEP creates a bird's-eye-plot for visualing the driving scenario simulation.
function [detPlotter, lmPlotter, olPlotter, lulrdPlotter,luldetPlotter,bepAxes] = helperCreateBEP(visionSensor,leftUltrasonic)
    figureName = "BEP";
    Figure = findobj('Type','Figure',Name=figureName);
    if isempty(Figure)
        screenSize = double(get(groot,'ScreenSize'));
        Figure = figure(Name=figureName);
        Figure.Position = [screenSize(3)*0.17 screenSize(4)*0.15 screenSize(3)*0.4 screenSize(4)*0.6];
        Figure.NumberTitle = 'off';
        Figure.MenuBar = 'none';
        Figure.ToolBar = 'none';
    end
    clf(Figure);
    bepAxes = axes(Figure);
    grid(bepAxes,'on');
    legend(bepAxes,'hide');

    bep = birdsEyePlot(Parent=bepAxes,XLim=[-20 60],YLim=[-35 35]);
    caPlotterV = coverageAreaPlotter(bep,DisplayName="Vision Coverage area",FaceColor="b");
    caPlotterU = coverageAreaPlotter(bep,DisplayName="Ultrasonic Coverage area",FaceColor="m");
    detPlotter = detectionPlotter(bep,DisplayName="Object detections");
    lmPlotter = laneMarkingPlotter(bep,DisplayName="Lane markings");
    olPlotter = outlinePlotter(bep);
    plotCoverageArea(caPlotterV,visionSensor.SensorLocation,...
        visionSensor.MaxRange,visionSensor.Yaw, ...
        visionSensor.FieldOfView(1));
    plotCoverageArea(caPlotterU,leftUltrasonic.MountingLocation(1:2),...
        leftUltrasonic.DetectionRange(3),leftUltrasonic.MountingAngles(1), ...
        leftUltrasonic.FieldOfView(1));

    lulrdPlotter = rangeDetectionPlotter(bep,DisplayName="Left Ultrasonic Ranges",LineStyle="-");
    luldetPlotter = detectionPlotter(bep,DisplayName="Point-On-Target (Left Ultrasonic)",MarkerFaceColor="k");
end
helperPlotBEPVision plots ego vehicle outlines, lanes and vision detections on the bird's-eye-plot.
function helperPlotBEPVision(egovehicle,lmv,lmf,obdets,obValid,detPlotter, lmPlotter, olPlotter)
    plotLaneMarking(lmPlotter,lmv,lmf)

    [objposition,objyaw,objlength,objwidth,objoriginOffset,color] = targetOutlines(egovehicle);
    plotOutline(olPlotter,objposition,objyaw,objlength,objwidth, ...
        OriginOffset=objoriginOffset,Color=color)

    if obValid
        detPos = cellfun(@(d)d.Measurement(1:2),obdets,UniformOutput=false);
        detPos = vertcat(zeros(0,2),cell2mat(detPos')');
        plotDetection(detPlotter,detPos)
    end

end
helperPlotBEPUltrasonic plots ultrasonic range measurements and points on targets.
function helperPlotBEPUltrasonic(lobdets,lobValid,leftUltrasonic,lulrdPlotter,luldetPlotter)

    if ~isempty(lobdets) && lobValid
        lranges = lobdets{1}.Measurement;
        plotRangeDetection(lulrdPlotter,lranges,leftUltrasonic.FieldOfView(1),leftUltrasonic.MountingLocation,leftUltrasonic.MountingAngles)
        plotDetection(luldetPlotter,lobdets{1}.ObjectAttributes{1}.PointOnTarget(1:2)')
    end

end
Add Sensors to Driving Scenario and Obtain Measurements Without Actor Pose Inputs
In this example, you will add sensors to a driving scenario using the addSensors function. Then, you obtain sensor measurements without providing any ground-truth actor pose inputs and visualize them.
Set Up Driving Scenario and Bird's-Eye-Plot
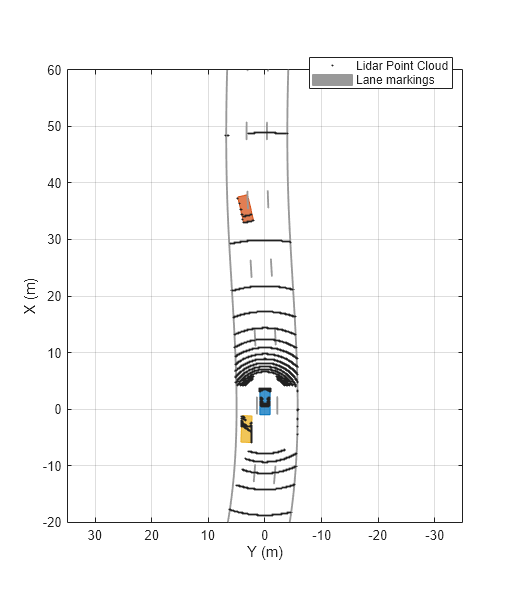
Create a driving scenario with an ego vehicle and two target vehicles. One target vehicle is in the front and the other is to the left of the ego-vehicle.
[scenario, egovehicle] = helperCreateDrivingScenario;
Configure a lidar sensor to be mounted at the center of the roof's front edge of the ego vehicle.
lidarSensor = lidarPointCloudGenerator(SensorIndex=1,SensorLocation=[1.5 0],ActorProfiles=actorProfiles(scenario));
Create a bird's-eye-plot to visualize the driving scenario.
[pcPlotter, lmPlotter, olPlotter, bepAxes] = helperCreateBEP;

Add Sensors and Simulate Driving Scenario
Add the lidar sensor to the driving scenario using the addSensors function. You can add sensors to any vehicle in the driving scenario using the addSensors function by specifying the actor ID of the desired vehicle. For this example, specify the ego-vehicle actor ID.
addSensors(scenario,lidarSensor,egovehicle.ActorID);
Simulate the driving scenario. Note that you are not providing any ground-truth actor pose inputs when you call lidarSensor object. The sensor automatically returns the point cloud based on the sensor parameters and actors within the sensor range.
legend(bepAxes,'show')
lookaheadDistance = 0:0.5:60;

while advance(scenario)

    lb = laneBoundaries(egovehicle,'XDistance',lookaheadDistance,'LocationType','inner');
    [lmv,lmf] = laneMarkingVertices(egovehicle);

    % Obtain lidar point cloud without any actor pose inputs
    [ptCloud,isValidTime] = lidarSensor();

    if isValidTime
        % Plot point cloud, vehicle outlines and lane markings
        plotPointCloud(pcPlotter,ptCloud);

        [objposition,objyaw,objlength,objwidth,objoriginOffset,color] = targetOutlines(egovehicle);
        plotOutline(olPlotter,objposition,objyaw,objlength,objwidth, ...
            OriginOffset=objoriginOffset,Color=color)

        plotLaneMarking(lmPlotter,lmv,lmf)
    end
end

Helper Functions
helperCreateDrivingScenario creates a driving scenario by specifying the road and vehicle properties.
function [scenario, egovehicle] = helperCreateDrivingScenario
scenario = drivingScenario;
roadCenters = [-120 30 0;-60 0 0;0 0 0; 60 0 0; 120 30 0; 180 60 0];
lspc = lanespec(3);
road(scenario,roadCenters,Lanes=lspc);

% Create an ego vehicle that travels in the center lane at a velocity of 30 m/s.
egovehicle = vehicle(scenario,ClassID=1,Mesh=driving.scenario.carMesh);
egopath = [1.5 0 0; 60 0 0; 111 25 0];
egospeed = 30;
smoothTrajectory(egovehicle,egopath,egospeed);

% Add a target vehicle that travels ahead of the ego vehicle at 30.5 m/s in the right lane, and changes lanes close to the ego vehicle.
ftargetcar = vehicle(scenario,ClassID=1,Mesh=driving.scenario.carMesh);
ftargetpath = [8 2; 60 -3.2; 120 33];
ftargetspeed = 40;
smoothTrajectory(ftargetcar,ftargetpath,ftargetspeed);

% Add a second target vehicle that travels in the left lane at 32m/s.
ltargetcar = vehicle(scenario,ClassID=1,Mesh=driving.scenario.truckMesh);
ltargetpath = [-5.0 3.5 0; 60 3.5 0; 111 28.5 0];
ltargetspeed = 30;
smoothTrajectory(ltargetcar,ltargetpath,ltargetspeed);
end
helperCreateBEP creates a bird's-eye-plot for visualing the driving scenario simulation.
function [pcPlotter, lmPlotter, olPlotter,bepAxes] = helperCreateBEP()
figureName = "BEP";
Figure = findobj('Type','Figure',Name=figureName);
if isempty(Figure)
    screenSize = double(get(groot,'ScreenSize'));
    Figure = figure(Name=figureName);
    Figure.Position = [screenSize(3)*0.17 screenSize(4)*0.15 screenSize(3)*0.4 screenSize(4)*0.6];
    Figure.NumberTitle = 'off';
    Figure.MenuBar = 'none';
    Figure.ToolBar = 'none';
end
clf(Figure);
bepAxes = axes(Figure);
grid(bepAxes,'on');
legend(bepAxes,'hide');

bep = birdsEyePlot(Parent=bepAxes,XLim=[-20 60],YLim=[-35 35]);
pcPlotter = pointCloudPlotter(bep,DisplayName='Lidar Point Cloud');
lmPlotter = laneMarkingPlotter(bep,DisplayName="Lane markings");
olPlotter = outlinePlotter(bep);

end
Input Arguments
scenario — Driving scenario
drivingScenario object
Driving scenario, specified as a drivingScenario object.
sensors — Sensors to add to driving scenario
visionDetectionGenerator object | drivingRadarDataGenerator object | ultrasonicDetectionGenerator object | lidarPointCloudGenerator object | lidarSensor object | cell array of detection generator objects
Sensors to add to the driving scenario, specified as one of the following:
A single
visionDetectionGenerator,drivingRadarDataGenerator,ultrasonicDetectionGenerator,lidarPointCloudGenerator, orlidarSensor(Lidar Toolbox) objectA cell array of any combination of detection generator objects listed above
Each detection generator must have a unique sensor ID specified by its
SensorIndex property.
hostVehicleID — Actor ID of vehicle in driving scenario
positive scalar
Actor ID of the vehicle in the driving scenario, specified as a positive scalar. The
function adds sensors to the vehicle corresponding to this ID in the scenario. You can
access the actor ID using the ActorID property of the vehicle
object.
hostVehicle = vehicle(scenario,ClassID=1);
hostVehicleID = vehicle.ActorID
Version History
Introduced in R2023a
MATLAB Command
You clicked a link that corresponds to this MATLAB command:
Run the command by entering it in the MATLAB Command Window. Web browsers do not support MATLAB commands.

Select a Web Site
Choose a web site to get translated content where available and see local events and offers. Based on your location, we recommend that you select: .
You can also select a web site from the following list
How to Get Best Site Performance
Select the China site (in Chinese or English) for best site performance. Other bat365 country sites are not optimized for visits from your location.
Americas
- América Latina (Español)
- Canada (English)
- United States (English)
Europe
- Belgium (English)
- Denmark (English)
- Deutschland (Deutsch)
- España (Español)
- Finland (English)
- France (Français)
- Ireland (English)
- Italia (Italiano)
- Luxembourg (English)
- Netherlands (English)
- Norway (English)
- Österreich (Deutsch)
- Portugal (English)
- Sweden (English)
- Switzerland
- United Kingdom (English)
Asia Pacific
- Australia (English)
- India (English)
- New Zealand (English)
- 中国
- 日本Japanese (日本語)
- 한국Korean (한국어)