Deploy Signal Segmentation Deep Network on Raspberry Pi
This example details the workflow for waveform segmentation of an electrocardiogram (ECG) signal using short-time Fourier transform and a bidirectional long short-term memory (BiLSTM) network. The example also provides information on how to generate and deploy the code and the trained BiLSTM network for segmentation on a Raspberry Pi® target (ARM®-based device).
The pretrained network in the example is similar to the Waveform Segmentation Using Deep Learning example.
This example details:
Processor-in-the-loop (PIL) based workflow to verify generated code deployed and running on a Raspberry Pi from MATLAB®
Generation of a standalone executable
The PIL verification process is a crucial part of the design cycle to check that the behavior of the generated code matches the design before deploying a standalone executable.
ECG Dataset
This example uses ECG signals from the publicly available QT Database [1] [2]. The data consists of roughly 15 minutes of labeled ECG recordings, with a sample rate of 250 Hz, measured from a total of 105 patients.
The ECG signal can be divided into the following beat morphologies [3]:
P wave — A small deflection before the QRS complex representing atrial depolarization
QRS complex — Largest amplitude portion of the heartbeat
T wave — A small deflection after the QRS complex representing ventricular repolarization
The segmentation of these regions of ECG waveforms can provide the basis for measurements that assess the overall health of the human heart and the presence of abnormalities.
Prerequisites
ARM processor that supports the NEON extension
ARM Compute Library (on the target ARM hardware)
MATLAB® Coder™
Embedded Coder®
Deep Learning Toolbox™
For supported versions of libraries and for information about setting up environment variables, see Prerequisites for Deep Learning with MATLAB Coder (MATLAB Coder).
Functionality of Generated Code
The core function in the generated executable:
Uses 15,000 samples of single-precision ECG data as input.
Computes the short-time Fourier transform of the signal.
Standardizes and normalizes the output.
Labels regions of the signal using the pretrained BiLSTM network.
Generates an output file with the labels.
waveformSegmentation Function
An entry-point function, also known as the top-level or primary function, is a function you define for code generation. You must define an entry-point function that calls code-generation-enabled functions and generates C/C++ code from the entry-point function. All functions within the entry-point function must support code generation.
In this example, waveformSegmentation is the entry-point function. It takes an ECG signal as an input and passes it to the trained BiLSTM network for prediction. The performPreprocessing function preprocesses the raw signal and applies the short-time Fourier transform. The genClassifiedResults function passes the preprocessed signal to the network for prediction and displays the classification results.
type waveformSegmentationfunction out = waveformSegmentation(in)
%#codegen
persistent net;
if isempty(net)
net = coder.loadDeepLearningNetwork('trained-network-STFTBILSTM.mat', 'net');
end
preprocessedSignal = performPreprocessing(in);
out = cell(3,1);
for indx = 1:3
out{indx,1} = genClassifedResults(net.predict(preprocessedSignal{1,indx}));
end
end
Create a Connection to the Raspberry Pi
Use the MATLAB Support Package for Raspberry Pi function, raspi, to create a connection to the Raspberry Pi. In the following code, replace:
'raspiname'with the name of your Raspberry Pi'pi'with your username'password'with your password
r = raspi('raspiname','pi','password');
The example shows the PIL-based workflow for verification of code and design and then creates and deploys a standalone executable. Optionally, if you want to directly deploy a standalone executable, you can skip PIL execution and go to creating a standalone execution.
Generate PIL MEX Function
The first step shows a PIL-based workflow to generate a MEX function for the waveformSegmentation function.
Set Up Code Generation Configuration Object for a Static Library
Create a code configuration object for a static library and set the verification mode to 'PIL'. Set the target language to 'C++'.
cfg = coder.config('lib','ecoder',true);
cfg.VerificationMode = 'PIL';
cfg.TargetLang = 'C++';
Set Up Configuration Object for Deep Learning Code Generation
Create a coder.ARMNEONConfig object. Specify the version of the ARM Compute library as the one on the Raspberry Pi. Specify the architecture of the Raspberry Pi. (This example requires ARM Compute Library v19.05).
dlcfg = coder.DeepLearningConfig('arm-compute');
dlcfg.ArmComputeVersion = '19.05';
dlcfg.ArmArchitecture = 'armv7';
Set the DeepLearningConfig property of the code generation configuration object to the deep learning configuration object. Set the configuration object with MATLAB Source Comments visible in the code generation.
cfg.DeepLearningConfig = dlcfg;
cfg.MATLABSourceComments = 1;
Configure Code Generation Hardware Parameters for Raspberry Pi
Create a coder.Hardware object for the Raspberry Pi and attach it to the code generation configuration object.
hw = coder.hardware('Raspberry Pi');
cfg.Hardware = hw;
Specify the build folder on the Raspberry Pi.
cfg.Hardware.BuildDir = '~/waveformSegmentation';Generate Source C++ Code Using codegen Function
Use the codegen function to generate the C++ code. When codegen is used with MATLAB Support Package for Raspberry Pi Hardware, the generated code is downloaded to the board and compiled there. A PIL MEX function is generated to communicate between MATLAB and the generated code running on the Raspberry Pi.
Make sure to set the environment variables ARM_COMPUTELIB and LD_LIBRARY_PATH on the Raspberry Pi. See Prerequisites for Deep Learning with MATLAB Coder (MATLAB Coder) (MATLAB Coder).
codegen -config cfg waveformSegmentation -args {coder.typeof(single(ones(1,15000)),[1,15000],[0,0])} -report
### Target device has no native communication support. Checking connectivity configuration registrations...
 Deploying code. This may take a few minutes.
### Target device has no native communication support. Checking connectivity configuration registrations...
### Connectivity configuration for function 'waveformSegmentation': 'Raspberry Pi'
Location of the generated elf : /home/pi/waveformSegmentation/MATLAB_ws/R2020b/C/Users/eshashah/OneDrive_-_bat365/Documents/MATLAB/Examples/deeplearning_shared-ex28372959/codegen/lib/waveformSegmentation/pil
Code generation successful: View report
Run Executable Program on Raspberry Pi
Load the MAT-file ecgsignal_test. The file stores a sample ECG signal on which you can test the generated code.
Run the generated waveformSegmentation_pil MEX function on the test signal.
load ecgsignal_test.mat;
out = waveformSegmentation_pil(test);
### Starting application: 'codegen\lib\waveformSegmentation\pil\waveformSegmentation.elf'
To terminate execution: clear waveformSegmentation_pil
### Launching application waveformSegmentation.elf...
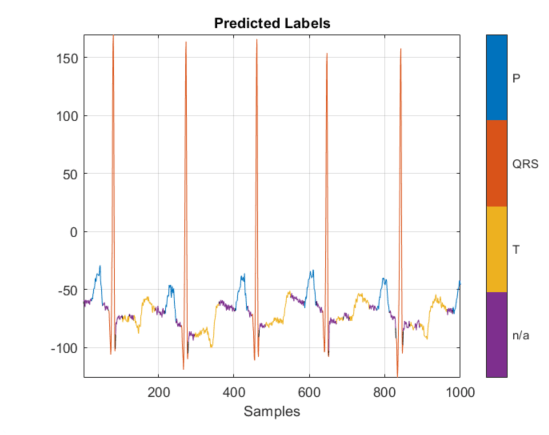
Display the signals with predicted labels.
labels = categorical(out{1}(1,2000:3000));
msk = signalMask(labels);
plotsigroi(msk,test(1,2000:3000))
title('Predicted Labels')
After the verifying the output of the PIL MEX function, you can create a standalone executable for the waveformSegmentation function.
The next part shows the code generation workflow to generate and deploy a standalone executable in the code for prediction on a Raspberry Pi using the MATLAB Coder App.
Create a Standalone Executable Using the MATLAB Coder App
The MATLAB Coder app generates C or C++ code from MATLAB® code. The workflow-based user interface steps you through the code generation process. The following steps describe a brief workflow using the MATLAB Coder app. For more details, see MATLAB Coder (MATLAB Coder) and Generate C Code by Using the MATLAB Coder App (MATLAB Coder).
Select the Entry-Point Function File
On the Apps tab, click the down arrow on the far right of the toolstrip to expand the apps gallery. Under Code Generation, click MATLAB Coder. The app opens the Select Source Files page. Enter or select the name of the entry-point function, waveformSegmentation.

Click Next to go to the Define Input Types page.
Define Input Types
1. Select Let me enter input or global types directly and set the value of the input in as single (1x15000).
2. Click Next to go to the Generate Code step. Skip the Check for Run-Time Issues step because MEX generation is not supported for code generation with the ARM Compute Library.
Generate Code
1. Set values in the generate code dialog box:
Set Build Type to
Executable (.exe)Set Language to
C++Set Hardware Board as
Raspberry Pi
2. Click the More Settings button:
In the Custom Code pane, in additional source files, browse and select
ecgsegmentation_main.cpp. For more information on writing a C/C++ main function, refer to Structure of Generated Example C/C++ Main Function (MATLAB Coder).In the Hardware pane, set the username and password for the Raspberry Pi board.
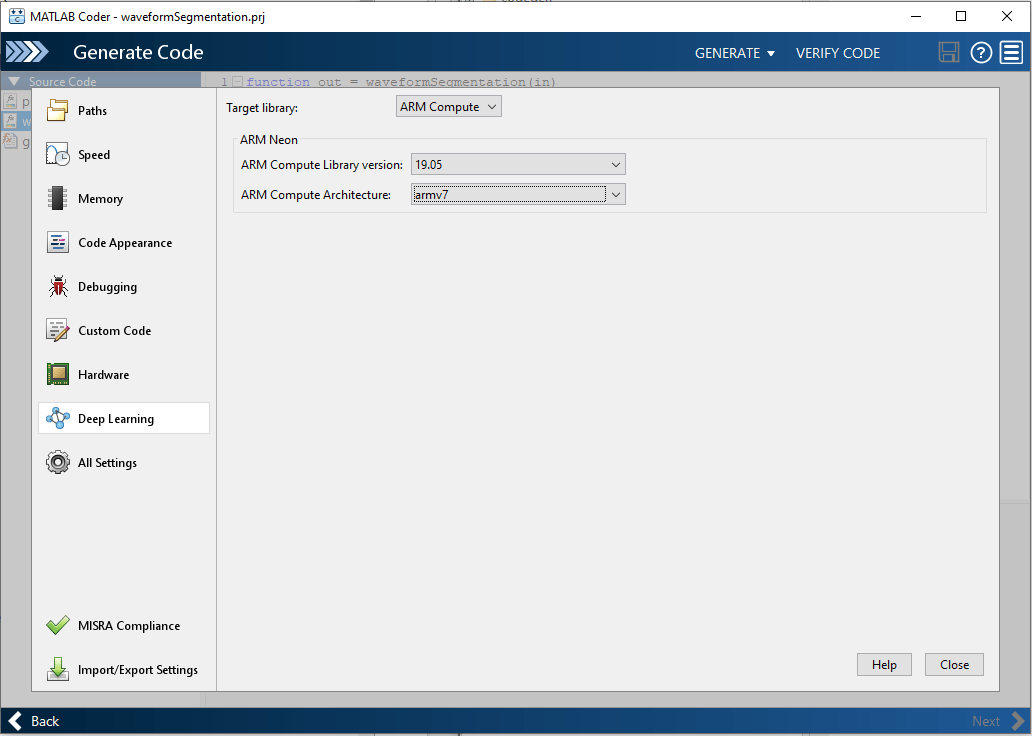
In the Deep Learning pane, set Target library to
ARM Compute. Specify ARM Compute Library version and ARM Compute Architecture.

3. Close the Settings window and generate code.
4. Click Next to go to the Finish Workflow page.
Fetch Generated Executable Directory
Once the code generation is complete, you can test the generated code on the Raspberry Pi. As a first step, copy the input ECG signal to the generated code directory. You can find the directory manually or by using the raspi.utils.getRemoteBuildDirectory API. This function lists the directories of the binary files that are generated by using the codegen function. Assuming that the binary is found in only one directory, enter:
applicationDirPaths = ...
raspi.utils.getRemoteBuildDirectory('applicationName','waveformSegmentation');
targetDirPath = applicationDirPaths{1}.directory;
Copy Input Files to the Raspberry Pi
To copy files required to run the executable program, use putFile, which is available with the MATLAB Support Package for Raspberry Pi Hardware. The input.csv file contains a sample ECG signal that is used to test the deployed code.
r.putFile('input.csv',targetDirPath);
input = dlmread('input.csv');
Run Executable Program on Raspberry Pi
Run the executable program on the Raspberry Pi from MATLAB and get the output file to MATLAB. Input file name should be passed as the command line argument for the executable.
exeName = 'waveformSegmentation.elf'; % Executable name
command = ['cd ' targetDirPath ';./' exeName];
system(r,command)
outputPath = strcat(targetDirPath,'/*.txt');
getFile(r,outputPath)
Display the signals with predicted labels. The output is depicted in the figure.
load ecgsignal_test.mat;
labels = categorical(textread('out.txt','%s')');
msk = signalMask(labels(1,2000:3000));
plotsigroi(msk,test(1,2000:3000))
title('Predicted Labels')

References
[1] McSharry, Patrick E., et al. "A dynamical model for generating synthetic electrocardiogram signals." IEEE® Transactions on Biomedical Engineering. Vol. 50, No. 3, 2003, pp. 289–294.
[2] Laguna, Pablo, Raimon Jané, and Pere Caminal. "Automatic detection of wave boundaries in multilead ECG signals: Validation with the CSE database." Computers and Biomedical Research. Vol. 27, No. 1, 1994, pp. 45–60.
[3] Goldberger, Ary L., Luis A. N. Amaral, Leon Glass, Jeffery M. Hausdorff, Plamen Ch. Ivanov, Roger G. Mark, Joseph E. Mietus, George B. Moody, Chung-Kang Peng, and H. Eugene Stanley. "PhysioBank, PhysioToolkit, and PhysioNet: Components of a New Research Resource for Complex Physiologic Signals." Circulation. Vol. 101, No. 23, 2000, pp. e215–e220. [Circulation Electronic Pages; http://circ.ahajournals.org/content/101/23/e215.full].
See Also
Apps
- MATLAB Coder (MATLAB Coder)
Functions
codegen(MATLAB Coder) |fsst|signalMask
Related Topics
- Long Short-Term Memory Neural Networks (Deep Learning Toolbox)
- Generate C Code by Using the MATLAB Coder App (MATLAB Coder)
- Prerequisites for Deep Learning with MATLAB Coder (MATLAB Coder)
- Structure of Generated Example C/C++ Main Function (MATLAB Coder)
