Create and Deploy Interactive Dashboard on Arduino
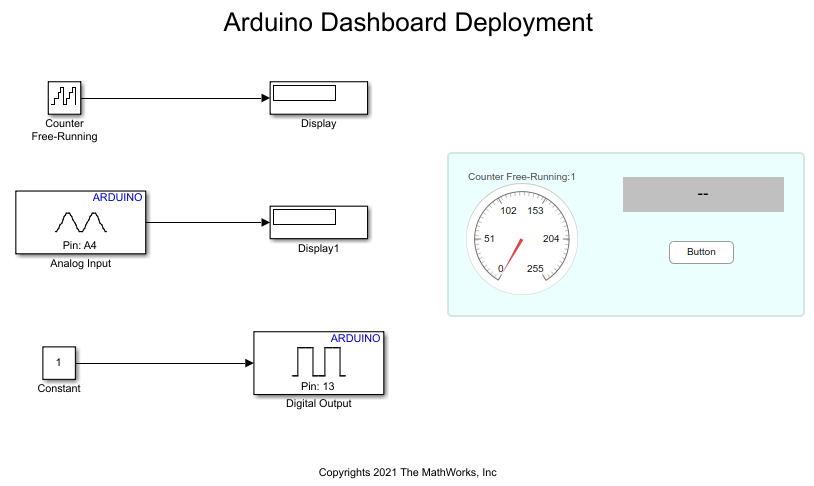
This example shows how to use the Simulink® Support Package for Arduino® Hardware to create and deploy an interactive dashboard panel using the Push Button, Circular Gauge, and Display blocks on your Arduino hardware. You can interface any graphical TFT or LCD display type with your Arduino hardware to view the dashboard. This example uses the Adafruit® ILI 9341 graphical LCD display.
In this example, you can view these outputs on the dashboard that you interface with the Arduino board.
Circular Gauge — Displays output from the free-running counter.
Display — Measures the analog voltage of an Arduino board pin.
Push Button — Toggles the status of an Arduino onboard LED. The Push Button block enables you to use the touch-screen interface of an LCD display to toggle the LED status.
Prerequisites
For more information on how to use the Simulink Support Package for Arduino Hardware to run a Simulink model on an Arduino board, see Get Started with Arduino Hardware.
Required Hardware
Any Arduino board
Adafruit ILI 9341 shield
USB cable
Connecting wires
Connect Adafruit ILI 9341 Display to Arduino Mega 2560
Make these connections between the Adafruit ILI 9341 display and the Arduino Mega 2560 hardware board.
     Adafruit ILI 9431 TFT Display   |   Arduino Mega 2560 Board
 ------------------------------------------------------------------
             3-5V Vin                |           5V
               GND                   |           GND
               CLK                   |           52
              MISO                   |           50
              MOSI                   |           51
               C/S                   |           10
               D/C                   |           9
                Y+                   |           A2
                X+                   |           4
                Y-                   |           5
                X-                   |           A3
               IM1                   |           3.3V
               IM2                   |           3.3V
               IM3                   |           3.3V
               RST                   |           8
Configure Simulink Model and Calibrate Parameters
Open the arduino_dashboard_deploy Simulink model.

Configure this parameter in the Block Parameters dialog box of the Counter Free-Running block.
Set Number of bits to
8for the counter to count from 0 to 255.
The Display block connected to the output of Counter Free-Running block displays the count value from 0 to 255.
Set Sample time to
1.
Configure this parameter in the Block Parameters dialog box of the Analog Input block.
Set Sample time to
0.1.
The Display block connected to the output of the Analog Input block displays the voltage of the Arduino board pin.
Configure this parameter in the Block Parameters dialog box of the Digital Output block.
Set Pin number to
13.
In the Constant Block Parameter dialog box, set Constant value to either 0 or 1 to toggle the status of the Arduino board pin.
Create Dashboard Panel
Go to the Simulink > Dashboard library and add the Push Button, Circular Gauge, and Display blocks to the Simulink model.
Select all the dashboard blocks and click the three dots that appear below the selection rectangle. Select Promote to panel to create a new panel around these blocks.
Connect the output of Counter Free-Running to Circular Gauge, Analog Input to Display, and Constant to Push Button.
Configure Dashboard Properties
1. On the Modeling tab of the Simulink model, click Model Settings.
2. In the Configuration Parameters dialog box, select Hardware Implementation. Set the Hardware board parameter to your Arduino board.
3. Expand Target hardware resources and, from the Groups section, select Display properties.
4. Select Enable code generation for Dashboard blocks and click Launch Display Configuration Setup to launch the wizard to configure the dashboard properties.
5. On the Select Display Type and Library screen, set Display type to Graphical Display and Library to Adafruit ILI 9341.
6. Click Next.
7. On the Configure Display Properties screen, configure these properties.
a. Set Size (width x height) to 240x320 px.
b. Set Display orientation to 0 degrees.
c. Set SPI chip select pin to 10.
d. Set Reset pin to 8.
e. Set Command/Data pin to 9.
8. Click Finish.
Deploy Simulink Model
On the Hardware tab of the Simulink model, in the Mode section, select Run on board and then click Build, Deploy & Start.
On the LCD display, observe the counter and digital voltage values on the Circular Gauge and Display, respectively.
Press the Push Button on the touch screen and observe the status of the LED.
Due to memory constraints, the appplication dashboard may not deploy on an Arduino board with less memory than the Arduino Mega 2560 board, such as an Arduino Uno or Arduino Leonardo. To ensure successful deployment of the application dashboard on your Arduino board, consider deploying a dashboard that consists of only a few dashboard elements. For example, you can remove the Display dashboard block to reduce the memory size of the application dashboard.
Arduino Due board does not support the touch screen capability of the Adafruit ILI 9341 Touch TFT display. To try this example on the Arduino Due board, use one of these solutions:
1. Remove the Pushbutton Dashboard block from the Simulink model before you deploy it on the Arduino Due board.
2. Use a custom display that the Arduino Due board supports. Note that you must configure this display in the Display properties section of the Configuration Parameters dialog box.
Other Things to Try
Implement the dashboard on a custom graphical display. Make sure to appropriately configure the Dashboard properties in the Configuration Parameters dialog box. Use the datasheet for the display to ensure you make the correct connections with your Arduino board.
Implement the dashboard panel on the LCD display of your choice for the Arduino Based Smart Watering of Plants example. Use the Display and Push Button blocks to implement the dashboard.
