Estimate Induction Motor Parameters Using Parameter Estimation Blocks
This example uses the parameter estimation blocks provided by Motor Control Blockset™ to estimate these parameters of an AC induction motor (ACIM):
Magnetizing current, Id0 (A)
Stator resistance, Rs (Ohm)
Rotor resistance, Rr (Ohm)
Magnetizing inductance, Lm (Henry)
Stator leakage inductance, Lls (Henry)
Rotor leakage inductance, Llr (Henry)
Motor inertia, J (Kg.m^2)
Friction constant, B (N.m.s)
Motor parameter estimation is vital for implementing motor control algorithms accurately. Accurate motor parameters enable the algorithm to compute the control parameters with precision. Therefore, an accurate representation of motor parameters results in efficient speed tracking when you run induction motors using control techniques such as field-oriented control (FOC). Motor parameter estimation also enables you to verify the parameter values provided by the motor datasheet. In addition, it enables you to accurately replicate the plant model in Simulink® using which you can simulate real-world scenarios and tests that are difficult to execute using a physical hardware setup.
An accurate simulation helps you reconfigure and run these tests multiple times, which can be difficult when you use physical hardware. Therefore, these exhaustive tests enable you to predict, find, and fix problems with ease including failures that are hard-to-reproduce failures.
The example shows you how to use these blocks to design and implement an induction motor parameter estimation algorithm on a Texas Instruments™ hardware board:
ACIM Parameter Estimation Configurator
Id0 Estimator
ACIM Rs Estimator
RrL Estimator
ACIM Mechanical Parameter Estimation
Alternatively, using this example as a reference, you can utilize these blocks to implement a similar algorithm on a different hardware board or configuration.
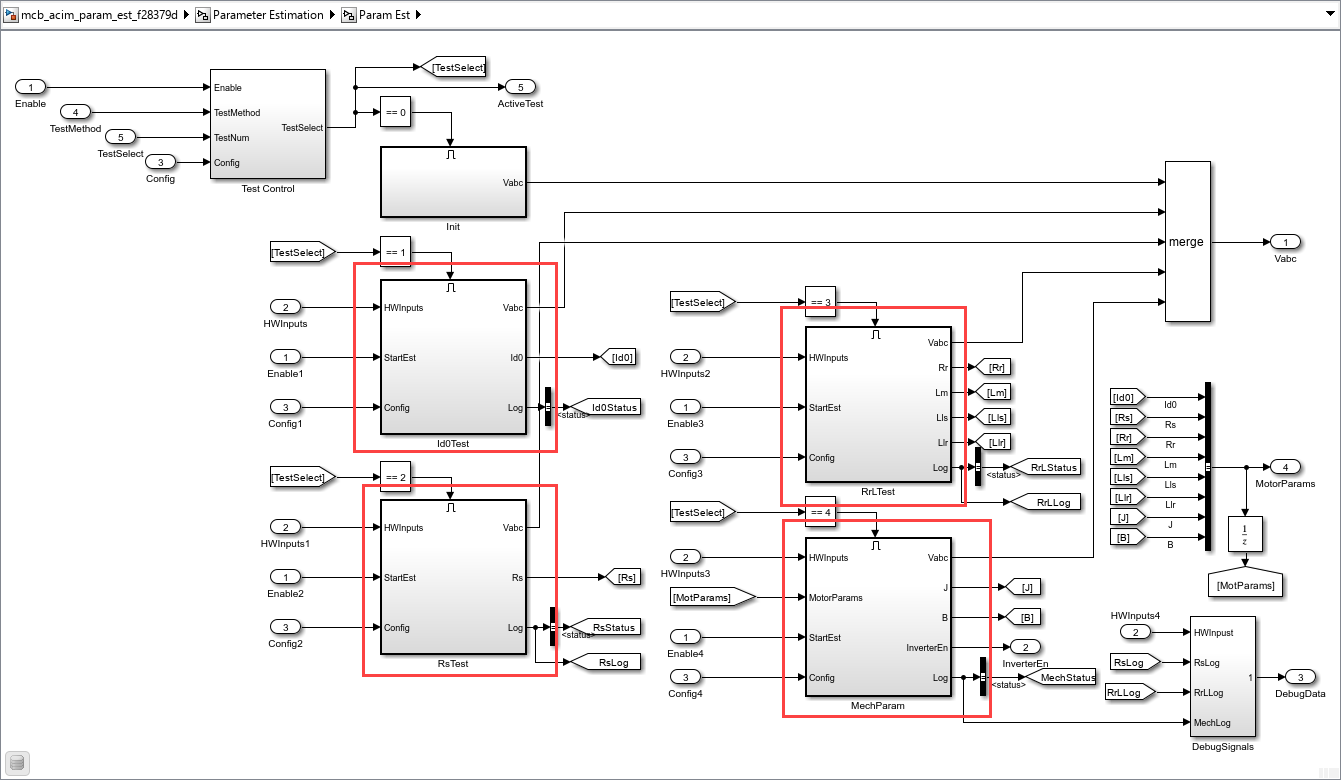
The target model included in the example uses the parameter estimation blocks in the mcb_acim_param_est_f28379d/Parameter Estimation/Param Est subsystem.

These subsystems use the parameter estimation blocks to estimate Rs, Ld, Lq, and the mechanical parameters:
Id0Test— Uses the Id0 Estimator block to estimate the magnetizing current.
RsTest— Uses the ACIM Rs Estimator block to estimate the stator resistance.
RrLTest— Uses the RrL Estimator block to estimate rotor resistance, magnetizing inductance, stator leakage inductance, and rotor leakage inductance.
MechParam— Uses the ACIM Mechanical Parameter Estimation block to estimate motor inertia and the friction constant.
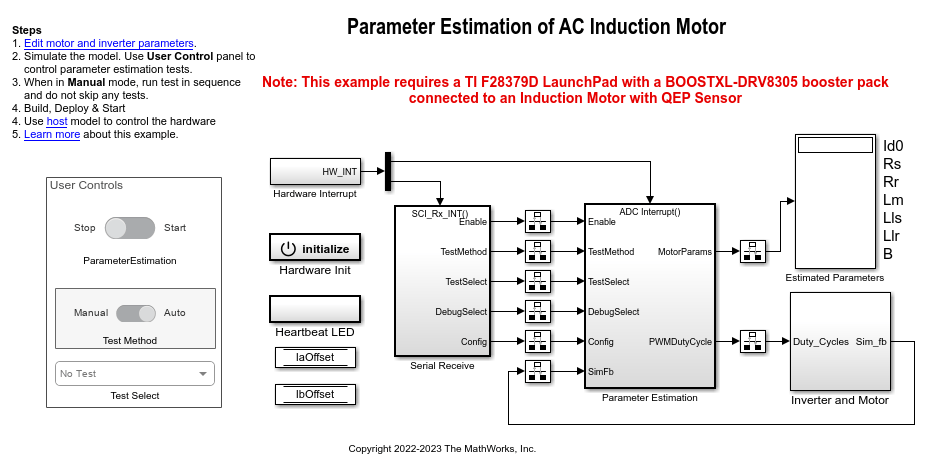
If you are only simulating the example, the target model displays the estimated parameters. When you deploy the target model to the hardware, use the host model to estimate the parameters using the hardware.
Model
The example includes the mcb_acim_param_est_f28379d model.
You can use the model for both simulation and code generation.

For details about the supported hardware configuration, see Required Hardware in the Generate Code and Deploy Model to Target Hardware section.
Required bat365 Products
To simulate model:
Motor Control Blockset
Stateflow® (needed only if you modify the example model)
To generate code and deploy model:
Motor Control Blockset
Embedded Coder®
C2000™ Microcontroller Blockset
Stateflow (needed only if you modify the example model)
Prerequisite
Check and update the mandatory motor, inverter, and other system parameters listed in the model initialization script mcb_acim_param_est_f28379d_data.m.
In addition, you can update the optional motor parameters for simulation.
You can use the inverter and motor hardware datasheet to determine these values.
Simulate Model
This example supports simulation. Follow these steps to simulate the model.
1. Open the target model included in this example.
2. If required, change the configuration elements for parameter estimation, by updating the mask parameters of the ACIM Parameter Estimation Configurator block available in the mcb_acim_param_est_f28379d/Serial Receive/Variant Subsystem/Sim subsystem. For more details, see ACIM Parameter Estimation Configurator.
3. In the User Controls section, ensure that the Parameter Estimation switch is set to Stop.
4. Click Run on the Simulation tab to simulate the model.
5. Set the Test Method switch to either the Manual or Auto mode.
- Manual — This mode enables you to manually execute the tests one by one in the prescribed sequence.
- Auto — This mode enables you to automatically run all the tests in the prescribed sequence.
If you are using Manual mode:
a. Set the Test Method switch to Manual.
b. Use the Test Select button to select the first test Id0.
c. Turn the Parameter Estimation switch to Start. The model runs the Id0 estimation test, after which it displays the computed value in the Estimated Parameters field.
d. Turn the Parameter Estimation switch to Stop.
e. Similarly, use the Test Select button to select the next test and repeat steps c to e.
Note: Ensure that you run all tests in the prescribed sequence of Id0 > Rs > (Rr, Lm, Lls, Llr) > (J, B). Do not skip any test.
During simulation, the target model does not support computation of J.
If you are using Auto mode:
a. Set the Test Method switch to Auto.
b. Turn the Parameter Estimation switch to Start. The model starts running all tests in the prescribed sequence of Id0 > Rs > (Rr, Lm, Lls, Llr) > (J, B), after which it displays the computed parameter values in the Estimated Parameters field.
c. Turn the Parameter Estimation switch to Stop.
Note: In the Auto mode, the Test Select button selection has no effect.
During simulation, the target model does not support computation of J.
Generate Code and Deploy Model to Target Hardware
This section shows you how to generate code and run the parameter estimation algorithm on the target hardware to estimate parameters of the connected motor.
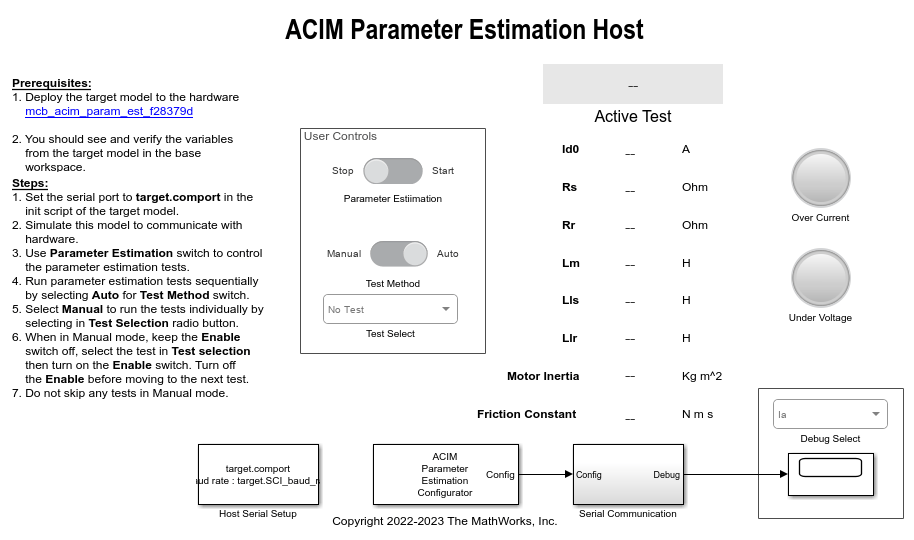
This example uses a host and a target model. The host model is a user interface to the controller hardware board. You can run the host model on the host computer. The prerequisite to use the host model is to deploy the target model to the controller hardware board. The host model uses serial communication to command the target to run the parameter estimation tests.
Required Hardware
The example supports the following hardware configuration. You can also use the target model name to open the model from the MATLAB command prompt.
LAUNCHXL-F28379D controller + BOOSTXL-DRV8305 inverter: mcb_acim_param_est_f28379d
For connections related to the hardware configuration, see LAUNCHXL-F28069M and LAUNCHXL-F28379D Configurations.
Generate Code and Run Model on Target Hardware
1. Complete the hardware connections.
2. The model automatically computes the ADC (or current) offset values. To disable this functionality (enabled by default), update the value 0 to the variable inverter.ADCOffsetCalibEnable in the model initialization script.
Alternatively, you can compute the ADC offset values and update them manually in the model initialization scripts. For instructions, see Run 3-Phase AC Motors in Open-Loop Control and Calibrate ADC Offset.
3. Compute the quadrature encoder index offset value and update it in the model initialization script associated with the target model. For instructions, see Quadrature Encoder Offset Calibration for PMSM.
Note: Verify the number of slits available in the quadrature encoder sensor attached to your motor. Check and update the variable pmsm.QEPSlits available in the model initialization script. This variable corresponds to the Encoder slits parameter of the quadrature decoder block. For more details about the Encoder slits and Encoder counts per slit parameters, see Quadrature Decoder.
4. Open the target model. If you want to change the default hardware configuration settings of the model, see Model Configuration Parameters.
5. Load a sample program to CPU2 of the LAUNCHXL-F28379D board to ensure that CPU2 is not mistakenly configured to use the board peripherals intended for CPU1. For example, load the program that operates the CPU2 blue LED by using GPIO31 (c28379D_cpu2_blink.slx). For more information about the sample program or model, see the Task 2 - Create, Configure and Run the Model for TI Delfino F28379D LaunchPad (Dual Core) section in Getting Started with Texas Instruments C2000 Microcontroller Blockset (C2000 Microcontroller Blockset).
6. Click Build, Deploy & Start on the Hardware tab to deploy the target model to the hardware.
7. Verify that the variables from the target model are available in the MATLAB base workspace.
8. Click the host model hyperlink in the target model to open the associated host model.

For details about serial communication between the host and target models, see Host-Target Communication.
9. If required, change the configuration elements for parameter estimation, by updating the mask parameters of the ACIM Parameter Estimation Configurator block available in the host model. For more details, see ACIM Parameter Estimation Configurator.
10. In the model initialization script associated with the target model, specify the communication port using the variable target.comport. This variable updates the Port parameter of the Host Serial Setup, Host Serial Receive, and Host Serial Transmit blocks available in the host model.
11. In the User Controls section, ensure that the Parameter Estimation switch is set to Stop.
12. Click Run on the Simulation tab to run the host model. This initiates communication between the host model and target hardware.
13. Use the Test Method switch to select either Manual or Auto mode.
- Manual — This mode enables you to manually execute the tests one-by-one in the prescribed sequence.
- Auto — This mode enables you to automatically run all the tests in the prescribed sequence.
If you are using Manual mode:
a. Set the Test Method switch to Manual.
b. Use the Test Select button to select the first test Id0.
c. Turn the Parameter Estimation switch to Start. The model runs the Id0 estimation test after which it displays the computed value in the host model.
d. Turn the Parameter Estimation switch to Stop.
e. Similarly, use the Test Select button to select the next test and repeat steps c to e.
Note: Ensure that you run all tests in the prescribed sequence of Id0 > Rs > (Rr, Lm, Lls, Llr) > (J, B). Do not skip any test. The host model uses the Active Test field to display the test that is currently running.
If you are using Auto mode:
a. Set the Test Method switch to Auto.
b. Turn the Parameter Estimation switch to Start. The model starts running all tests in the prescribed sequence of Id0 > Rs > (Rr, Lm, Lls, Llr) > (J, B) after which it displays the computed parameter values in the host model.
c. Turn the Parameter Estimation switch to Stop.
Note: In the Auto mode, the Test Select button selection has no effect.
The host model uses the Active Test field to display the test that is currently running.
14. Use the Debug Signal combo box to select a debug signal. Monitor the selected signal in the scope.
Note: The model can interrupt the currently running test and turn the following LEDs red to protect the hardware from the following faults:
Over-current fault — This fault occurs when the actual current drawn from the power supply is more than the overcurrent limit specified by the variables motor.OverCurrLim and motor.I_rated in the model initialization script.
Under-voltage fault — This fault occurs when input DC voltage drops below the undervoltage limit specified by the variables inverter.UnderVoltLim and inverter.V_dc in the model initialization script.
After the parameter estimation tests are complete, the host model saves the computed parameters in the motorParam variable inside the base workspace.
